To work on your website you must log in to the WordPress Dashboard.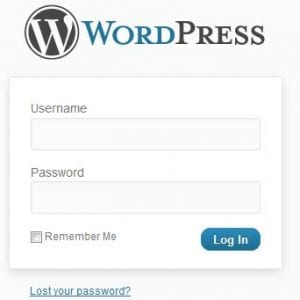
The login page can be accessed by clicking on the login in what WordPress calls the ‘Meta’ links. Or you can go directly to the login area by typing in the following url >> www.yoursite.com/wp-admin (change yoursite.com to the url of your website).
Enter your username and password, click Log In and you will be taken to the WordPress Dashboard.
If you enter the wrong username or password – WordPress does a cool shaking of the login box to warn you that you entered something wrong.
If you are working on a trusted computer with limited access by other people – you could click the ‘Remember Me’ checkbox.
And if you happen to have lost your password – there is a link to retrieve it.
TIP >> Do NOT use the default username of ‘admin’ as it makes your site susceptible to hacking = always create unique user names for higher security.
There is the At a Glance area in the main window which gives you a brief outline of what your website includes right now. It shows the number of Posts and Pages. It also has a breakdown of Comments – showing how many total, how many approved, pending and spam. All of these can be clicked on directly to go to that section.
The dashboard is set up for quick and easy access to the areas you need to use most often. This is a view of a new install showing the WordPress Dashboard. With a new site there is a nice welcoming message and some easy Next Steps to get you started. Once you have gotten use to WordPress and been in the Dashboard a couple times – you can easily remove the Welcome message box by clicking the Dismiss in the top right corner.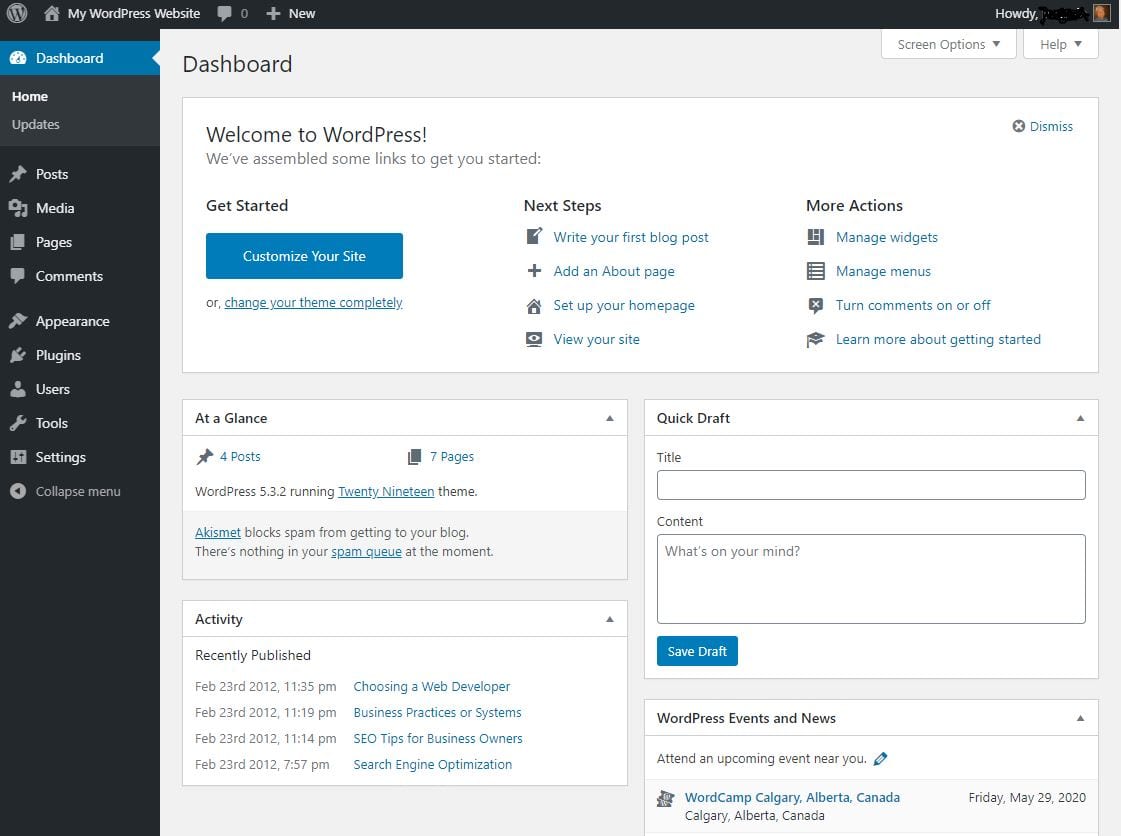
The WordPress Dashboard has a menu down the left side that has sub-menus that pop-out for easy access of their items.
Along that left side menu area you can see the various links to allow you to add Posts, Pages, various Media, Settings and much more. As I mentioned, any of these menu items will open up to more options.
There is a menu at the top and you can use the + New that allows a simple click on this and you can start entering a new post, page, user, media or link. Or you can choose from any of the other menu items to add pages, plugins, themes, or adjust the configuration of your website.
We will go through many of the links on the left as we configure your site in the next lessons.
Here is another view of a more Active WordPress Dashboard.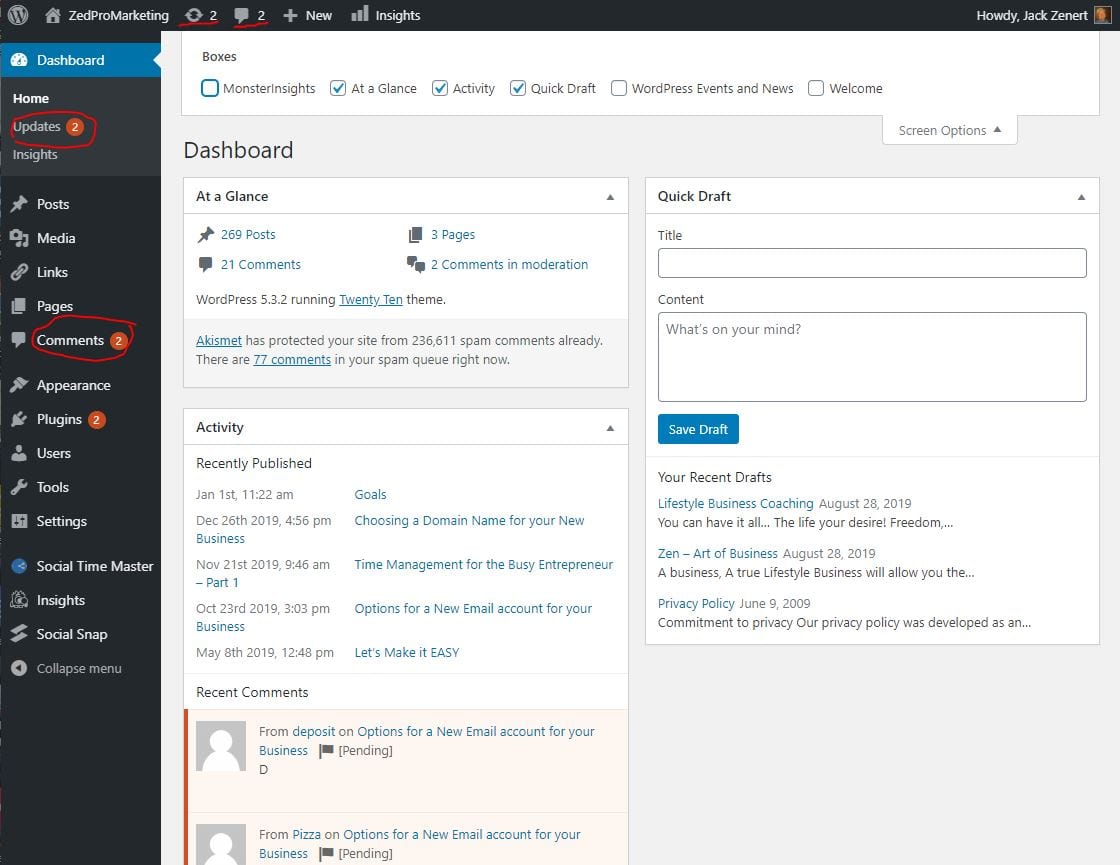
Here you can see red dots beside a few of the menu items on the left to let you know there are some issues you should deal with. First there is a couple of updates to take care of. Second there is a couple comments to review and approve or mark as spam (we will go over both of these steps in later lessons).
You will notice that at the very top bar you can also get quickly to both updates and comments.
There is a red dot beside Plugins as well, and this will relate to the updates available for the plugins.
You can see on the right side in the main window area, you have the ability to do a quick draft post. Simply type in the title and the information you want in your post, hit Save Draft, and you have added to your website – it is that easy.
Your own dashboard may not have a couple of the links on the left hand side such as Social Time Master and Social Snap. These are extra plugins that I have added to this WordPress site. We will be covering all about plugins in future lessons.
For your hands-on portion of your lesson we have two assignments:
First go to the Quick Draft area and enter a new post. Don’t worry about what you will enter, as we can change it or delete it. You need to learn how easy it is to put content on a website. So enter a title, and the content (type in a short story, joke or simply nonsense), and some tags if you like and then hit Save Draft.
After you have clicked on Save Draft – click on Posts on the left hand menu. This should bring you to a list of posts – with the one you just created at the top. You should see – Draft after the title.
Next click on the top of the dashboard where it says ‘Visit Site’ and you will be take to your website.
As you have not logged out of the WordPress Dashboard area – you will see a new menu at the top of your website that allows you to get back into the Dashboard or directly into certain tasks like add new posts or pages (Yellow highlighted area) or log out of WordPress (Red circled area).

Hover over your site title in the top menu area (in the screen shot above the top Marketing Jack text). This will pop up a menu that will allow you to click on Dashboard.
Take time to review the menu links on the left. Open up each of the main areas and then click on the sub-links. Skim over the page that each sub-link takes you to to start to get an awareness of what you can do with WordPress as your ultimate website tool.
For review – check out this video about the WordPress Dashboard.
Next let’s move on the the next lesson on WordPress Settings.