WordPress is a database driven Content Management System (CMS). Therefore it works very well to create complete websites using WordPress.
 And by having the content controlled by a database, you are free to change the design, and have all your pages updated automatically with those new design features. That is one of the reasons that makes WordPress such an amazing website development tool. Need your logo updated – simply change the logo in the WordPress theme and it is changed in all your website pages.
Pages are static. That means that the information displayed on a page doesn’t change, or doesn’t change often. A great example of a page would be the About or Contact Us section of a website.
Creating a page in WordPress is very similar to the process we just went over in Lesson 4 on creating a post.
Like I stated when we discussed creating a post in the previous lesson – the primary difference between pages and posts in WordPress is that posts are time-relevant where as pages are for more fixed content.
Review pages v posts by watching the video below.
I do not like to use the word static content because I believe that you should always be updating and improving the content on your site. But the general topic and the majority of the content on a page will be fixed.
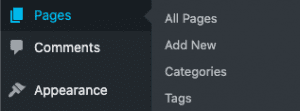 You can access your pages from the main left hand menu. There you can click to view All Pages, or you can Add New page.
When you are on the listing of all your pages – you can also click the button at the top to Add New page.
And finally – from anywhere in the WordPress Dashboard you can roll your mouse over the + New in the top menu and select Page.
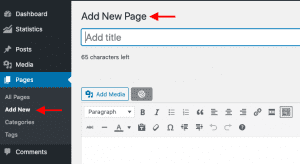
When adding a new page, working in the Visual tab is best as you can see what your post will look like as you create it. Remember the WordPress content editor in visual mode is WYSIWYG.
I also recommend you create your content before hand using a text editor like Notepad or TextPad and then copy and paste the text into the content box. Even though WordPress does have an auto-save feature, you never know when you may lose your internet connection or something else goes wrong and all your hard work will be gone.
First thing for creating your page is to give your page a title. This needs to be descriptive of the content on the page so that both your website visitors and the search engines know what to expect when going to this page. Keep titles short, include a key word or key phrase from your content, and try to make your titles interesting so that people will want to visit your page. Remember that when they search and your page comes up in the results – it is your title that they see at the top.
Your content can then be entered into the content box and formatted using the tools available. I recommend having both toolbars visible and this can be done by clicking the last icon (Show/Hide Kitchen Sink) on the top toolbar.
When formatting your text content it is best to use the dropdown menu containing Paragraph and various Heading settings. This is a better way to format headings and sub-headings in your content as it can be controlled site-wide with the theme you are using – thus keeping your site looking consistent from page to page. As well, the search engines will recognize the heading tag and put more importance on those words when they list your pages in the search engine rankings. More detail Search Engine Optimization advice will be covered in other modules.
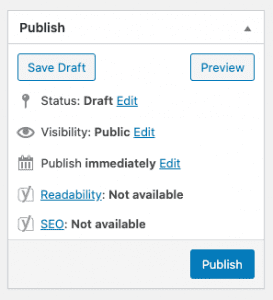
When creating your page you have the option to go live with that content by click the Publish button. This will put that new page out for the whole world to see (but depending on your theme, you may have to add that page to the menu of your website). The other option is to click the Save Draft button and then you are able to Preview the page to make sure it is the way you want it to look. As long as you have your window sized so that the content box is approximately the same size as the content area on your website, the look in the visual tab should be almost the same as what the page will look like on your website.
Media can be inserted into the page content using the Add Media button above the content box tool bar. WordPress makes it a simple process to drag and drop pictures from your files to the new window it opens up for media. We will be covering more advanced editing of media in other modules.
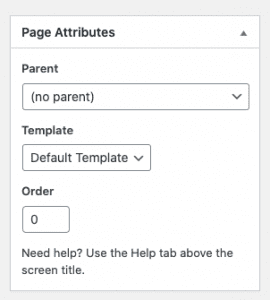 One more advanced technique is that if you are creating a page that is directly related to another page – in a way a child or sub-page – then you have the option to declare which page is the parent page. For example if you had created a page about Trees. And now you were creating a new page about the Oak Tree – then you could assign your Tree page as the parent.
Then you may also create a page about Birch trees and also assign the Tree page as parent of that page. This allows you to group pages underneath their parent page. This is done with the Page Attributes >> Parent drop box on the right side of the page.
Using the Parent / Child relationship through the page attributes is how I often structure a website. The Parent pages are the m
ain menu items and the Child pages are sub-pages that are linked in a drop down menu. Some themes do this for you automatically when you specify the Parent / Child relationship. Other themes allow you to completely customize your menus so you can configure this yourself.
Every time you create or edit a page, be sure to either click the Publish (or Update if this page has already been published) button or the Save Draft button so that your work is not lost.
Review on how to add new pages by watching the videos below.
Let’s move on to learn about WordPress Categories.